[ 63XC.COM | REVIEWS | MONSTER ]
Monster Monkey
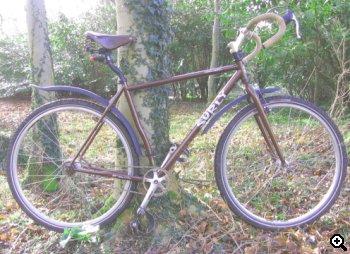
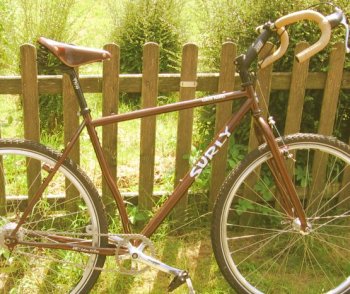
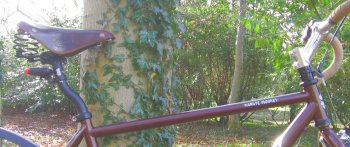
I'd better start by announcing clearly that this isn't a Karate Monkey review. It isn't even one of the quasi-review pieces that we run on 63xc.com because we know that you're pretty left-field and don't need product writeups that end with a star rating and a 'Best Buy' logo. Nor, come to that, is it endorsed by Matt Chester. What it is is an account of how I used a low/mid-price frameset to get what I would call a 'Chester-style' setup, Matt having pretty much nailed this stuff back around the turn of the millennium. If you've come onto the scene in the last couple of years, you might know this same setup as 'monster cross', a term popularised by the Vulture Cycles guys. I've seen other descriptions, too. To avoid any possible confusion, I'll spell out exactly what I was trying to achieve. I wanted big wheels (700c rims and large tyres) and dropbars. To imagine my ideal position, take a typical modern setup and rotate the rider backwards around the cranks, taking care that his contact points maintain their relationship to each other. The bars will come up and back, the saddle will go back and maybe down a bit, and the rider will be able to look around and breathe and maybe take a hand off the bars sometimes. There! Isn't that better? Some of you will know that I achieved much of this on Grasshopper, the offroad fix which I built up by accident on a 50s Elswick Hopper and which appears at the bottom of the Rides page. Later I found support for my approach in the work of Grant Petersen at Rivendell, the aforementioned Matt Chester, Don McClung, and a few others. They'd likely disagree over the detail, but there is a kind of Grouch Consensus that it's a smart idea to move your saddle back and get some weight off your hands. Of course, the modern mountainbike position with its low flat bars evolved in response to real need. If you're going to handle an intense burst of technical riding, you have to be able to transfer weight to the front wheel some of the time. But riding for hours on bumpy but otherwise undemanding trail with your hands three inches below your saddle seems a bad idea. This is where drop bars come in. With judicious setup, you can achieve both a high, relaxed position and a low, aggressive one. A lot of Matt's offroad dropbar setups seem to be designed this way. They have what I call the 'praying mantis' look, with the bars high and far forward. That's how I wanted my bike. My plan was to ride the easy stuff on the flats with my weight back and to drop into the hooks as and when necessary. I keep a pretty good parts bin and much of the build was a given. I had one of the first pre-production LeVeL hubs ready-built into a fat Mavic 700c rim, Schwalbe expedition tyres, a Brooks sprung saddle, and all the Nitto drop bars I could ever want. What I didn't have was a suitable frameset. I'd arbitrarily set a £350.00 (US$700) limit on the frame and that left surprisingly few options. I considered the On-One Pompino, the Surly CrossCheck and Karate Monkey, the Van Dessel Country Road Bob, and the Redline Monocog 29er. Actually I didn't consider the Van Dessel or the Monocog for very long, because they're not imported to the UK. (This is a shame, because the Monocog's sizing would have suited my purposes just fine.) I lingered a little longer over the Pompino, but I don't get on with compact geometry. Plus, my Italian friends would think me infantile if I turned up on a bike called a 'Blowjob'. So that left the Surlys. It was nearly the CrossCheck. Everyone who rides a CC seems to love it, but I've had a couple of nasty experiences with Grasshopper's horizontal top tube and decided that it would be smart to avoid any repetition on my new bike. Thus it was that the Karate Monkey's standover clinched it. Looked at closely, the Monkey had a couple of other good points. The McClungesque bent seat tube would help get my backside above the rear hub. And, although the massively overbuilt fork looked ugly, it would take a lot of abuse. (I try to minimise strain on the bike, but by the end of a long ride I tend to be short on finesse and given to riding straight through obstacles.) I didn't much like the 2006 colours, but the butted seat tube was a good thing. But it wasn't all good news. The Monkey had a surprisingly low BB -- for fixed gear use, it was 165 or 170mm cranks or nothing. Worse, the head tube was much shorter than I wanted. I was going to need a mutant stem. Ahem. That's a common noun, not a proper one. The stem I was after would be about as far from the 3TTT Mutant as you can get. Figuring that I would need every available centimetre of rise, I looked for the longest stem I could find. I turned up a trials stem branded Try-All. This monster combined a pretty steep angle with a 165mm (count 'em) extension. Bingo? I boxed up all the parts and took them down to the estimable GA Cycles in Southampton for assembly. The results were... OK. GA did a superb job of interpreting my requests and the parts came together well. However, it quickly became apparent that things were not quite as I had wanted.
The culprit turned out to be the Brooks saddle. Or, more specifically, the chassis of the Brooks, which is shaped to give maximum support to the springs. Installed on the laidback Grasshopper it had provided a perfect riding position. On the Monkey, with a straight post, it was impossible to get it far enough back for comfort. Just like Grant Petersen says, the global trend is against laidback seatposts. It took a lot of diligent searching to turn up an old-stock Titec El Norte, a peculiar post with a kink halfway up. Needless to say, it looked mental next to the Monkey's bent seat tube, but it got the saddle where I wanted it. At a price, however. I collect old-fashioned fitting advice, and one of my favourites states that, if you jam your elbow against the nose of your saddle, your fingertips should just brush the flats of your bars. (This is for drop bars, OK?) With the Monkey's saddle back where I wanted it, I found my stretched fingertips wiggling in several inches of empty air. My riding position was way more stretched than I wanted. This shouldn't have come as a surprise -- contemporary MTBs tend to be long in the body -- but I hadn't realised that the Praying Mantis setup demands quite a short top tube. I was now in a quandary. To get the Monkey working as I wanted, I needed an unusually steep stem, and the expense of a custom job didn't seem to be in keeping with the exercise. Fortunately I turned up a comfort bike stem that looked like it would do the job. (I guess I should mention that I'm now selling said stem via Hubjub, so there's some issue with my critical objectivity here.) The item in question -- made by Delta in the US -- boasts 45 degrees of rise, making it the steepest on the market. On paper, it would keep the bars up where I wanted them without the penalty of an overextended riding position. Reader, I swapped out the stem.
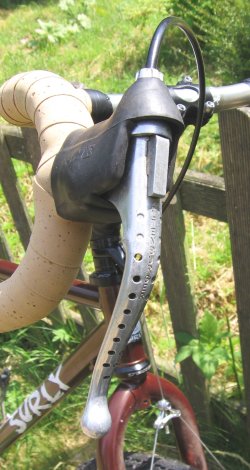
In its new guise, the Monkey seems a lot more purposeful. The shorter reach pulls things together nicely. The flats are now much closer to the saddle, giving me a nice, soft ride, and I don't have to think twice about going down into the drops. I still have some reservations about the Monkey, but I've ended up with a comfortable, low-maintenance bike that takes all kinds of terrain in its stride, and I didn't need to borrow money to do it. Given my unusual tastes I guess I should consider going fully custom, but I'm pretty happy with what I've been able to manage off the peg. By the way, if I've got the ear of some manufacturer, can I possibly ask you to study this 1960s Altenberger lever that I fitted? It is the best offroad dropbar brake lever I have ever used, for the simple reason that it has a bobble on the end, and is thus unlikely to stick into you in the event of a crash. If you make a copy, ideally with modern materials and cable fittings, you will sell zillions. There's no consultancy fee for this advice, but I'd like a supply of the levers, please.
[ TOP ] |
Writer
Will Meister likes riding tall.
Date
v1.0 written February 2007
Related
Will's Grasshopper is here.
There's a useful discussion of 700c offroad geometry here.
Matt's no longer actively building, but the Vulture Cycles site is here.
Mailing list
Join the 63xc.com list.