[ 63XC.COM | HOWTO | DISK TO FIXED ]
Disk Hub / Fixed Hub
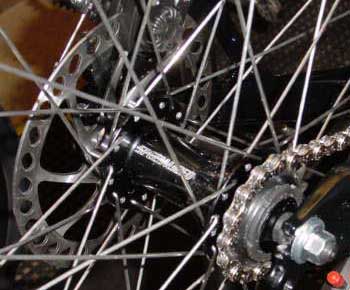
So, you want to ride a fixed gear, but you don't have a fixed gear hub? Here's a conversion to get you on the trail. In this How-to, you'll learn how to mount a standard track cog on a disk hub, giving you a tough fixed gear hub for not much money. You'll need a disk hub, a non-ramped cog, and some basic tools. Any disk hub will do, but I recommend that you pick a singlespeed. That way, your conversion will come out as a flip-flop, fixed on one side and freewheel on the other. This particular S/S hub is standard equipment on the Specialized P1. Cool, huh? Nice going for a $450 bike. There's a lot of suitable cogs on the market. The Shimano DX makes a pretty good choice. You want a big one: 15t is about the smallest you can get away with, and 19t would be a better bet. Take the wheel out of the bike, and remove the disk rotor. Remember to keep the fixing bolts safe! Clamp the disk rotor and the cog together with a Vice Grip. Make sure you get them properly centered. This will take some time, but you can use the inner splines as a reference point.
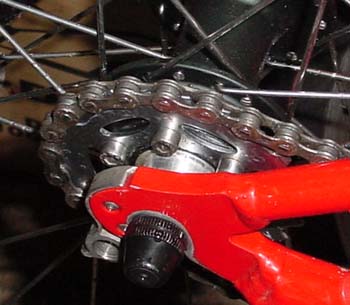
Set up your drill press. I'd recommend a carbide or cobalt bit. Put the clamped rotor and cog into the press with the rotor uppermost. Get everything lined up, then, with the drill switched off, work the lever. The drill bit should pass right through the mounting hole in the rotor to touch the cog. If it sticks, review your setup. Remember: measure twice, cut once. If you can preselect the drill speed, set it for about 1500rpm. Switch on the drill and make the first hole for real. Now, turn the rotor and cog around, and do the next hole. If you're working with a big cog, drill all six holes. If you're working with a 15t cog, drill three holes at the twelve o'clock, four o'clock and eight o'clock positions. Bolt the cog onto the hub. If you're using the original bolts, don't forget the Loctite! For a more refined look, try locking tabs and bolts like the ones on XT disk brakes. The hex cap bolts that are drilled for safety wire look even cooler. Put the wheel in the bike, and try the chainline. The first conversion I did was spot on, no adjustment needed. I haven't always been so lucky. You may need to adjust the spacing on the hub and/or crank and bottom bracket. Patience!
Here's a picture of my first conversion in place in an S-works frame. Sorry I don't have a picture of the P1--the frame turned out a little small for trailriding. [ TOP ] |

Writer
Jason Millington and his wife Kitty are students at UNCW, where he is working on a master's in geology. When not riding, studying or teaching labs, he works for Victor Matias at Chain Reaction Cycling.
Date
v1.0 written February 2003
Related
If you don't have a drill press or a workshop, you might want to get Highpath to do the work for you.
Legal
63xc.com and Jason Millington are not liable for any damage you do to yourself as a result of reading this article. And buy some decent safety glasses before you switch on that drill press.